Felt & Velcro Backrest Style Installation Instructions – Luxury Line
Print This Page
A. Front Bucket Cushions
(Note: Be careful to check all pieces. The driver’s and passenger’s sides on buckets may be opposites or slightly different. Also never attach to or tie around wires under seat)
1. 1. Lay the lower cushion cover on the seat cushion and push the flap through where the bottom and backrest meet.
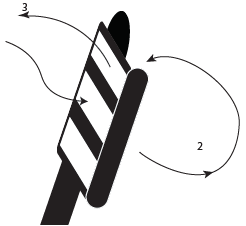
2. Pull the 3 straps through the gap where the lower cushion and backrest meet. Grab the back edge of the seat cover and pull back until the front corners and seams are properly aligned on the seat.
Some models may have a plastic rivet or be attached to the air bag wiring connector/bracket (e.g. 2015-2016 Ford F-150). You will not need to detach this type of flap to install the covers.
3. On the back side of the seats feed the outer 2 straps under the seat towards the corresponding front buckles. (Whenever possible go above all electronics, wires, and metal bars). Feed the straps through the corre- sponding buckles and tighten. (Some models may have Velcro instead of the outer 2 straps. If it does, just pull flap tight and attach Velcro to the car-pet). The center strap is our “Anchor Strap” that you need to feed under the seat, going above a metal support spring, and returning to the buckle that is attached to the strap. This will keep your seat cover from rotating forward over time.
4. Wrap excess strap material above the tightened straps to keep it out of the way.
5. If you have electric seat controls on the upholstery of the seat, there will be cutouts provided. To get a clean look tuck the opening around the plastic panel, if possible.
6. If you do not have electric seat controls, just tuck the side skirt of the seat cover under the top edge of the plastic trim panel around the base of the seat (Depending on your particular seat. Most will tuck under the plastic; some will cover over the plastic).
7. Untie the loop at the end of the skirt string on the door side of the cushion. Tuck the bottom skirt strings through the side corners at the back of the seat cushion. Pull the strings until the end with the loop is near the edge of the seat. Then feed the untied end through the loop end and cinch tight like a drawstring bag. Pinch the string to hold it in place and tie off in a knot. (Using a slip knot will make it easier to remove the cushion in the future). On some models the cover will fit better if you go down the side of the seat (behind the plastic trim) and take the strings under the seat to tie them together. Please ensure that the string is not resting against any sharp metal edges and will not interfere with the movement of the seat track. (Please call if you need any help deciding which is best for your model)
(If you have adjustable headrests or lumbar supports on the backrest or seat cushion, cutouts will be provided)
Buckle Use: The strap pushes from the back of the buckle through the middle opening, then back through the front slot allowing it to be pulled tight.
B. Front Bucket Backrests
(Note: Be careful to check all pieces. The driver’s and passenger’s sides on buckets may be opposites or slightly different.) Warning-If you have active headrests with the wire running into the headrests, DO NOT remove the headrests. Accommodations should be made for your headrests. Contact us if this has not been done.)
1. Remove the adjustable headrests before installing. (See section C for removal details). Line up the top of the seat cover with the top of the seat, and pull the cover down on the seat a little at a time. This will ensure a smooth, snug, and straight fit. (If your seats have seat mounted air bags, open the overlapping Velcro flap before sliding the cover over the backrest).
2. Tuck the fabric under the plastic head rest housing using the provided installation tool.
3. Push the flap with felt on the end of it through where the backrest and bottom meet.
4. Pull the flap from the front to the back to get a good form fit on the front side of the seat cover and seal to the strip of 1” hook/hard Velcro sewn along the bottom inside edge on the backside of the cover.
5. Re-attach Velcro tabs for the airbag flap (if applicable) and then manipulate the cover so that the seams are aligned to match the original seat. If necessary, tighten and re-seal the Velcro.
C. Installation of Headrest Covers
1. Most vehicles have a release button(s) or small pinhole at the base of the post on the plastic housing. Depress-ing the button(s) will release the headrests so they can be removed (Some buttons are flush with the side of the plastic housing). If it has a pinhole you can use a paperclip or small Allen wrench to depress the button inside of the housing. If both plastics housings have buttons/pinholes, these must be pushed at the same time to remove the headrest.
2. To install the cover, squeeze the headrest together as you slide the cover over it, being careful not to split the seams. (The longer flap with loop/soft Velcro on it will usually go towards the back of the headrest).
3. Once the cover is on the headrest, manipulate it to align the cover seams with the upholstery seams.
4. Pull the front and back flaps together and connect the hook/hard and loop/soft Velcro pieces together.
D. Armrest Covers
1. Slide the cover over the armrest. To get a perfect fit make sure the seams of the armrest cover match up with the seams of the armrest upholstery. Once the seams are aligned, seal the Velcro closure on the backside of the armrest.
2. If you have cup holders on the armrest, cutouts will be provided. Whenever possible, tuck the material around the cutout under the edge of the cup holder plastic.
E. 40/20/40 Front Seat
1. 1. Installing the 40 sections are the same steps as A, B, and C.
2. With the 20 section backrest/console in the down position open the lid of the console and attach the lid cover. It will either have Velcro straps side to side or will be an envelope type sleeve that you will slide over the lid. There will normally be a strip of loop/soft Velcro sewn along the back edge of the lid (depending on model). Fit the un-der side of the console/backrest on. The front edges should slightly cap over the edge of the front of the console, and the back edge of the cover should have a strip of hook/hard Velcro sewn onto it that you will attach to the Velcro on the back edge of the lid. Once the 2 pieces of the console are connected to each other pull the sides of the lower piece up to the edge of the console and attach the Velcro tabs that are provided.
3. Lay the lower cushion section of the cover over the seat cushion or slide the lower cushion sleeve over the seat cushion (This will vary depending on vehicle and if the cushion does/does not have under seat storage). Push the straps/Velcro through where the back and bottom meet and wrap them under the seat cushion. Feed straps under the cushion to corresponding buckles if applicable. Pull the back of cushion cover towards the back of the seat until cover is tight and then either tighten straps or attach Velcro.
4. 4. Depending on model, attach the Velcro tabs on the sides of the cushion to the carpet under the seat or pull drawstring tight and tie to itself (See step 7 in section A.).
5. If you have a center headrest, tuck fabric below plastic housing and reattach the headrest.