Rear Seat Installation Instructions – Luxury Line
Print This Page
A. Rear Bottom Cushion
1. If the lower cushion(s) does not fold forward or have room to feed the straps under the seat, you will need to remove the lower seat cushion (In most cases the rear seat bottom can be released and removed by depress-ing buttons on the lower front edge or by giving the front edge of the seat a sharp tug upward). If you are un-sure of how to remove the seat cushion please call us (800.453.8830) for assistance.
2. Lay the cover on the bottom cushion and align the seams with the seams of the cushion upholstery. Flip the seat cushion over (if seat removal was necessary) and match up the straps to the corresponding buckles on the front and rear edges of the cover.
3. Secure the straps to the buckles and tighten. Then pull the drawstring tight and attach the ends to each other or something solid on the under-side of the seat.
4. Wrap excess strap material above the tightened straps to keep it out of the way.
5. Do not put the lower seat cushion back in until after you have attached he backrest covers (see section E).
(If you have adjustable headrests cutouts will be provide)
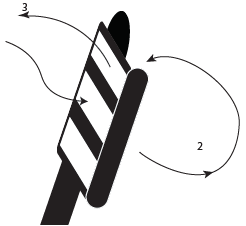
Buckle Use: The strap pushes from the back of the buckle through the middle opening, then back through the front slot allowing it to be pulled tight.
B. Rear Backrest (Truck-non-folding backrest)
1. If the seat has adjustable headrests remove them before installing. (See section G for removal details) Line up the top of the seat cover with the top of the seat and pull down until capped securely over the shoulders. Make sure to put the seat cover behind the center seatbelt before capping it over the shoulders of the seat. If this is not done, the seatbelt will not be accessible.
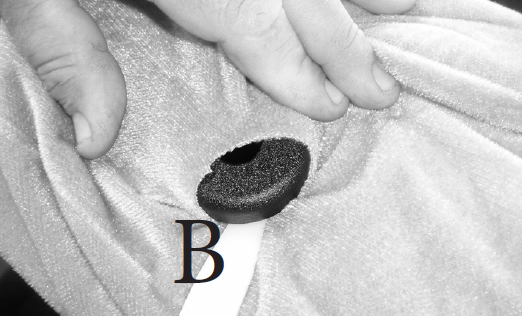
2. Tuck the fabric under the plastic headrest housing using the provided installation tool. (Picture “B” opposite side.)
3. With the bottom cushion(s) folded up against the backrest(s) drop the straps down the back of the seat to the buckles on the bottom of the seat cover.
4. You can use a long piece of wire/metal coat hanger to help feed the straps down the back of the seat.
5. Feed the straps through the corresponding buckles and pull them up the backside of the seat to tighten them. Moving the lower seat cushion up and down a little while doing this will help tighten the straps.
6. If you have an armrest a cutout will be provided. Tuck the inner arm liner behind the plastic trim if possible us-ing the provided installation tool.
7. Pull the seat cover tight side to side on the face of the seat and hook/tie the elastics on the side panels behind the back rest.
C. Rear Backrest (Sedan-non-folding backrest)
1. Installing the non-folding solid backrest requires removing it from the vehicle. Remove the adjustable head-rests before installing (if applicable). (See section G for removal details). Then undo the bolts at the bottom corners and push the front side of the cushion back at the top edge to release it from the hook lock. Then push the cushion upward to slide it over the hooks and release it.
2. Pull on the cover and manipulate it so the seams are aligned with the upholstery seams of the seat.
3. Tuck the fabric under the plastic headrest housing using the provided installation tool (if applicable).
4. Feed the straps top to bottom to the corresponding buckles and tighten.
5. If you have an armrest, a cutout will be provided in the seat cover. Tuck the inner arm liner behind the plastic trim if possible using the provided installation tool.
6. Pull the seat cover tight side to side and then hook/tie the elastics on the side panels to each other or to the straps of the seat cover.
7. Place the cushion back in vehicle by placing it above the hook locks and sliding down into place. Reinstall the bolts.
D. Rear Backrest (folding with or without side bolsters)
(Warning – If the bolsters contain airbags, DO NOT remove the bolster. Simply tuck the bolster seat coverin place. Removal of the bolster could cause deployment of the airbag).
1. Remove the adjustable headrests before installing. (See section G for removal details) Line up the top of the seat cover with the top of the seat, and pull the cover down on the seat a little at a time. This will ensure a smooth, snug, and straight fit.
2. Tuck the fabric under the plastic headrest housing using the provided installation tool. (See Picture “B” below)
3. Push the flap with felt on the end of it through where the backrest and bottom meet.
4. From the back side of the seat pull the felt flap towards you until there is a form fit on the front of the backrest. Then seal it to the strip of 1” hook/hard Velcro sewn along the bottom inside edge on the backside of the cover.
5. If you have an armrest, a cutout will be provided. Tuck the inner arm liner behind the plastic trim if possible using the provided installation tool.
6. Manipulate the cover so that the seams are aligned to match the original seat. If necessary tighten and re-seal the Velcro.
7. To remove the bolster (unless it has an airbag see above) undo the bolts at the bottom edge and push the bol-ster face in to release the hook locks. While pushing in on the bolster face, also push upward to release and remove the bolster from the vehicle.
8. Lay the bolster cover on the bolster and secure the straps and buckles/Velcro straps top to bottom and side to side. Set the bolster aside and install the backrest covers.
E. Reinstallation of Rear Bottom Cushion into Vehicle
1. If removing the bottom cushion was necessary reinstall it in vehicle at this point.
2. Make sure that the seat belt buckles and straps are accessible and are fed through the cutouts on the seat cover (depending on vehicle).
3. Push the cushion back under the bottom edge of the backrest and then push downward to latch it into place.
4. Be sure that the latch points are lined up correctly so that you do not bend or break the attachment clips.
F. Installation of Headrest Covers
1. Most vehicles have a release button(s) or small pinhole(s) at the base of the post on the plastic housing. De-pressing the button(s) will release the headrests so they can be removed (Some buttons are flush with the side of the plastic housing). If it has a pinhole you can use a paperclip or small Allen wrench to depress the button inside of the housing. If both plastics housings have buttons/pinholes, these must be pushed at the same time to remove the headrest.
2. To install the cover, squeeze the headrest together as you slide the cover over it, being careful not to split the seams. (The longer flap with loop/soft Velcro on it will usually go towards the back of the headrests)
3. Once the cover is on the headrest, manipulate it to align the cover seams with the upholstery seams.
4. Pull the front and back flaps together and connect the hook/hard and loop/soft Velcro pieces together.
G. Armrest Covers
1. Slide the cover over the armrest. To get a perfect fit, make sure the seams of the armrest cover match up with the seams of the armrest upholstery. Once the seams are aligned, seal the Velcro closure on the backside of the armrest.
2. If you have cup holders on the armrest cutouts will be provided. Whenever possible tuck the material around the cutout under the edge of the cup holder plastic.
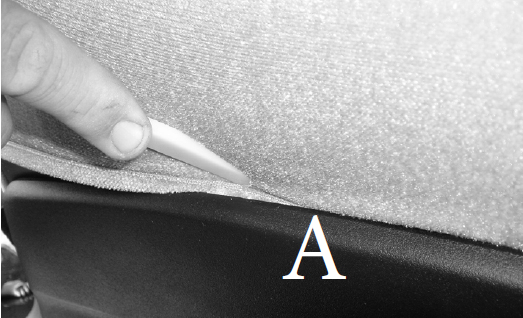
The enclosed installation tool is for your convenience when installing a seat cover. It can be used to tuck the fabric of the seat cover down behind plastic (see picture A), around the headrest housing (see picture B), and other areas as needed.